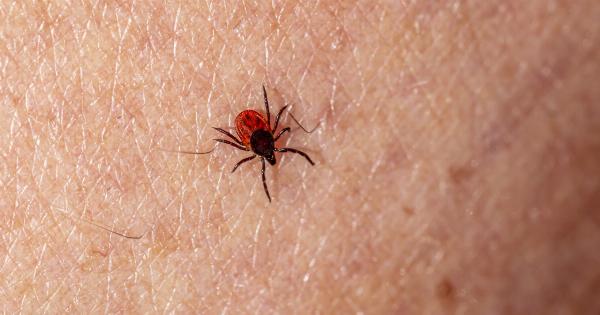
Tick bites are common in areas with a significant tick population, especially woods and grasslands. Ticks are arachnids that attach to humans and animals to feed on blood.
When a tick attaches to a person, it can transmit harmful pathogens that spread tick-borne illnesses like Lyme disease, Rocky Mountain spotted fever, and Powassan virus.
Removing a tick promptly is crucial to protect yourself from any potential diseases. Here are some essential tips to remove a tick that has attached to you.
Step by Step Guide to Remove A Tick
Step 1: Get Proper Tools
Before starting the removal process, ensure you have the right tools. Here’s what you need:.
- Tweezers: A fine-pointed set of tweezers is essential for tick removal. Avoid using any old tweezers or scissors as they may harm you and the tick too.
- Gloves: Use gloves to keep your hands clean and protected during the extraction process.
- Antiseptic wipes: Keep antiseptic wipes and alcohol with you to clean the tick bite site after removal.
- A jar or sealable bag: After removal, carefully dispose of the tick in a jar or sealable bag for further identification, if necessary.
Step 2: Locate the Tick
Finding where the tick is attached on your body is essential. Check your body carefully especially on the path of the ticks, these include armpits, groin area, hairline and behind the knee.
Dependent on the type of ticks, the bite is either a red ring or bump.
Step 3: Grasp the Tick
With the tweezers, hold the tick as close to the skin as possible without crushing it. Gently grasp the tick as close to its head as possible. You should avoid squeezing the engorged body, as this can push pathogens further into the bite wound.
Step 4: Pull the Tick Out
Slowly lift the tick straight upward, pulling gently with steady pressure. Avoid twisting the tick or jerking, as it may break into the skin, leaving the head or mouthparts embedded in the skin.
After pulling it out, clean the bitten area with an antiseptic wipe. The whole tick should be removed from the skin; if not, use the tweezers to take out its remainders. Do not handle the tick with bare hands.
Step 5: Disposal of the Tick
Place the tick in a jar or sealable bag and dispose of it safely. You may want to take it to a doctor’s clinic or the nearest public health department for further identification, in case you develop symptoms of sickness.
What Not to Do When Removing A Tick
It is essential to know what not to do when removing a tick from your skin, such as:.
- Never twist or jerk the tick when removing it, as it can lead to the head being stuck in the skin.
- Do not crush or handle the tick with bare hands, as it can transmit diseases like Lyme disease or Rocky Mountain spotted fever.
- Do not use petroleum jelly, alcohol, or any other chemicals on the tick, as it may increase the risk of infection.
When to Contact the Doctor
After removing the tick, monitor the site of the bite for any symptoms of infection or sickness for a few days.
Consult your doctor if you experience fever, rash, headache, joint pain, or any other disease symptoms, as it may indicate that you have contracted a tick-borne illness such as Lyme disease.
Contact your nearest public health department in case you need the tick to be identified, or if you would like to report a tick bite associated with any tick-borne illness.
Conclusion
Removing a tick as soon as possible is critical for preventing tick-borne illnesses. Removing a tick is a simple process that needs to be done with proper tools, care, and adequate knowledge.
It is also essential to take precautionary measures to avoid tick bites, such as using tick repellents, wearing protective clothing, and checking yourself after returning from wooded and grassy areas.


